Doctor Defroster answers defroster questions
Defroster repair and replacement questions and answers
Our very own Doctor Defroster has been answering defroster questions for going on twenty years. Rear window defrosters can be challenging to troubleshoot and repair. The Doc posts many of the most challenging defroster repair questions here.
Questions run from rear defroster tint damage and demister tab bonding to more challenging questions of how to repair a rear defroster.

Removing rear defroster tabs from defroster tab connector
The metal tab broke off the defroster grid, leaving the whole metal tab intact and still inserted into the black plastic connector. Is it possible to remove the metal tab from the black plastic connector in order to more conveniently manipulate and cover the metal tab?
Doctor Defroster
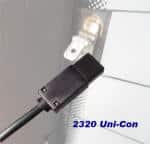
On may locking defroster tab connectors the release is along the edges or on top of the connector. The trick is to push on the release tab while pulling the tab to free it. We use needle nose pliers or a small screw driver on the tab release. If nothing looks like a locking device then try pulling the tab free using pliers. Be careful not to pull directly on the wire as it can come out of the connector.
Once you free the rear window defroster tab the repair is easy with Frost Fighter Defroster tab repair kits. The two part adhesive makes the structural and electrical bond in one simple operation. The adhesives high silver content provides the electrical conductivity needed for high amperage defroster bonding. https://frostfighter.com/defroster-tabs-uni-clip.htm
Defroster tabs coming off window! Defroster over heating?
I have tried several methods including another brand of tab repair kit, and soldering paste. Each time I have successfully gotten the tab to stick, but once the rear defrost is turned on, it quickly falls off. In the case of the solder, once the rear defroster was turned on it started smoking as if it was being heated by a soldering iron.
My question is this: Is it possible that the rear defroster is getting too hot? I read that the rear defroster should only be heating up to 85 degrees. That is no where near hot enough to melt solder, but it sure did melt the solder I used. The solder I used said it had a melting point of 430 degrees. So, is it possible that the system is getting too hot? If so, what would cause that?
Doctor Defroster
Rear defrosters are designed to heat a big area of glass which requires a good deal of power to accomplish. The problem you are experiencing has to do with the resistance between the tab connector and the defroster. If there is not a good electrical connection between the defroster and the tab the resistance in this joint turns the substantial energy flow into heat.
This can be hot enough to destroy the bonding ability of the “other brand” material and cause solder joints to fail. So it is not that your defroster is over heating it is that the connection between the tab and the defroster is over heating
The reason Frost Fighter Tab bonding kits are successful aside from a good structural bond is that it has a very high loading of silver resulting in the highly conductive bonds required in this application. We recommend the use of Frost Fighter Tab bonding kits for this type of repair.
Removing defroster tab, lots of defroster damage
“First the tab fell off the window.”
“I tired to solder it back on but that damaged allot of the buss bar. Then before I damaged it more I decided to use another brand tab reattachment kit. I let it cure and tried to turn it on but got nothing. So now I have a partially damaged bus bar and a tab stuck to the glass which has to come off and be replaced because it is about to break into 2 pieces.”
“What can I do to repair the buss bar, get the tab off the window and reattach it correctly?”
Doctor Defroster
While it sounds like a defroster disaster, this is relatively easy to repair this rear defroster. We use a screw driver, pliers and/or a soldering gun to remove the tab that is stuck to the defroster. See our Technical Bulletin on how to remove defroster tabs.
It is not absolutely necessary to remove broken defroster tabs as the new tab can be bonded on the defroster next to the damaged tab.
Since the tab is damaged make sure you have a Uni-Clip Defroster Tab and the Tab Bonding Kit handy. If the connector on the wire is damaged use our Uni-Con Connectors.
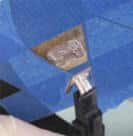
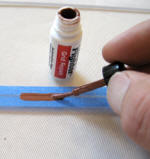
Pull off the masking tape and put a little silver adhesive on the tab, then place it into position. This should be done in one step and the silver conductive glue sets quickly. Wait five minutes for the bond to start the cure then use the hair dryer, lamp or other means to cure the bonding site (100-120F 30 minutes) and your back on the road.
Car runs on 24 volts, what about a 24 volt defroster?
“Hi my car runs a 24 volt DC system, can I still install one of your defroster kits without any power supply modifications”
Doctor Defroster
As luck would have it we are introducing new 24 volt defrosters and defroster controls. See the following webpage for 24 volt rear window defrosters.
See Clear View 24 volt defrosters.
Voltage to defroster disappears when plugged in...
“2007 Impala. Have checked defroster grid with Ohm meter. Grid checks fine from terminal to terminal. With vehicle running only have between 11 and 12 volts at main wire unplugged from grid. When I plug the wire up to the grid then I have no power to the grid.”
Doctor Defroster
The defroster circuit has a place of high resistance (impedance) that looks fine on a volt meter but goes to zero when a load is applied. Here is what to do to troubleshoot this problem.
- With the defroster on and connected to the vehicle, measure the voltage between the tabs at the sides of the defroster. This should be less than a volt or two.
- Now measure the voltage between the negative tab and a known good ground on the vehicle. If this shows 11-13 volts the problem is in the ground side of defroster. If the voltage is still zero then go to the next step.
- Connect the voltmeter between the positive tab on the defroster and a known good ground. If the meter reads the same low voltage in step 1 then the problem is in the positive side of the defroster circuit.
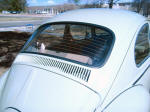
Defroster in VW Bug...
Doctor Defroster
The new Clear View II defrosters come in over 150 sizes so finding a defroster for your VW Beetle will be easy. The VW Beetle back glass varies between model years. The 1965 to 1971 including the 1971 Super Beetle are 35 inches wide and 15 inches tall.
The defroster you should look at is a 1209-3247. This is a modulated defroster and requires the ThermaSync control which is included along with wire harness.
Can I just get the defogger grids?
“Can I get just the grids for an 02 Camry. Grids are broken in too may places but current flows to existing bus bar fine.”
Doctor Defroster
Sorry but it’s not possible to replace individual defroster grids with Clear View grid elements. The Clear View defrosters have their own vertical side buss bars and these need to be used as they are important in setting the overall electrical resistance of the defroster hence the defrosters heating performance. Most grid damage can be repaired using the Grid Repair Kit. If the defroster is damaged beyond repair consider Clear View Defrosters.
Car has a demister / defroster but no switch
“My car has a defroster on the back window but no switch or wiring.”
Doctor Defroster

In the first case where the car has a defroster but no defroster wiring, order a 2712 ThermaSync defroster control and the Installation Wire Harness Pack. This is everything you need to connect and run your defroster.
In the second case, the car has the defroster circuit but no defroster, use the Clear View STICK Kits on the back glass connecting the defroster to the existing circuit and switch. The stick kit part is important as these defrosters do not require power modulation and can run on the native voltage of the vehicle.
Grid repair length?
“Recently we had the headliner in our Plymouth replaced. Now, seven out of ten of the rear window defogger grids do not work. When I checked, I found those non working grids were damaged. Two of them have a gap of about two inches, but the other five are three to five inches. Will the grid repair kit do the job for these more lengthy breaks?”
Doctor Defroster
Larger breaks in defrosters are repairable using the Defroster Grid Repair Kit. Repairs in 3-5 inch (7-12cm) range are common. Fix a few lines and give it a try to see how the defroster is working. Grid repairs using the Frost Fighter kit is not an all or nothing proposition.
It is easy to go back and increase the defroster performance by re-applying the repair material if needed.
Shape of rear window
“My question is in regards to the shape of my rear window. It is trapezoid in shape with the top being less in width than the bottom. Can the bus bars be installed at an angle to accommodate this shape which would make the heating elements different lengths, or must the unit be rectangular so that all of the elements are of equal length ??”
Doctor Defroster
Clear View defrosters can be applied to windows that are typically larger on the bottom. The side buss bars can be angled to accommodate the glass shape. It is a good idea to keep this difference between the top and bottom width as small as possible since the electrical resistance will be more the longer the grids which will effect the temperatures of the longer grids which will be slightly lower.
Defroster tab repair in cold weather
“I bought your kit to reattach my left side tab to my rear defrost, and was wondering if I could do the repair now with 30 degree temps, or should I wait till it warms a little. I understand that no matter when I do it I will need to heat the area that i’m working on, but I just was not sure if I should let the weather get a little warmer.”
Doctor Defroster
You are on the right track. Use a hair dryer, heat gun, heat lamp, lamp, shop light or what ever to put some heat on the tab repair site to cure the silver defroster tab bonding glue. This can be done inside of outside the vehicle for 30 minutes at 100-130 degrees F (43-54) for 30 minutes. Use a fixture to hold the heater as needed and check the site occasionally to make sure it does not over heat indicated by being very hot to the touch.
Tractor cabs, multiple defrosters
“We have a snow tractor that needs a defroster on several windows. The back window is large but the side windows are tall and narrow. Will the Clear View defrosters work for cabs?”
Doctor Defroster
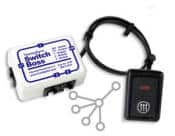
The defrosters can be controlled individually each with a separate switch or all from a single switch using the ThermaSync Switch Boss. If single button control is desired each defrosters ThermaSync control would be configured at the factory. To order defrosters using a Switch Boss – please call us or send an email for a quote. See our Contact Information
Defroster in Mazda Miata
“I have a Miata Hardtop without a rear glass defroster. Can I use a Clear View Kit?”
Doctor Defroster
Yes. Depending on the model the Miata has about a 10 x 29in rear window. With all the new Clear View defroster sizes now available finding a defroster with a perfect fit is a snap. See the Clear View Defroster Order Guide to select a defroster that will fit this window
Why do you yanks insist in calling them defrosters?
“We on the mainland across the way call them demisters. What is all this defroster business?”
Doctor Defroster
To embrace our friends from overseas here is a list of words that we think means “rear window defroster” in several languages.
– Defogger
– Demister
– dégivreurs de lunette arrière
– Heckscheibe Scheibenentfroster
– заднее окно антиобледенители
– bakruten varmetrådenes.
