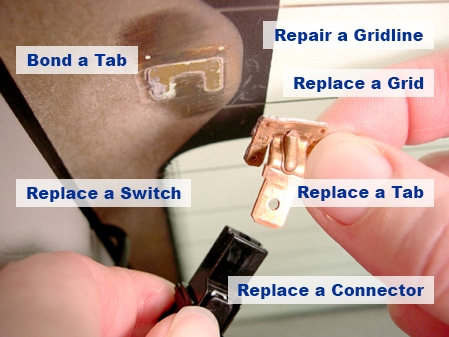
Interactive Repair Tool – Click the damaged part
Defroster Repair and Troubleshooting Guide
Rear window defroster, defogger or demister not working? Here is how to repair rear defrosters
Rear window defroster The guide to repair rear defrosters including the most common defroster damage.
Rear Window Defrosters
Automotive rear window defroster are sophisticated surface heaters. The grid pattern of thin brown horizontal lines are made from a silver ceramic conductor which is silk screened, essentially painted, onto the inside of the rear window and then baked at high temperatures.
These grids are connected to a high amperage circuit to provide rapid heating. The average defroster grid heats to approximately 85°+ F (29° C) and are very effective in clearing rear windows in difficult winter conditions.
Defrosters are critical to safe winter driving so when damaged it can mean expensive glass replacement but fortunately repairing a defroster is easy and this can mean big savings.
What rear window defroster parts do and how to repair them
It helps to know what that parts do before repairing or replacing the defroster.

Grid Lines or Elements
The thin horizontal lines are the grid lines or elements of the defroster. These thin lines do the heating when electrical current is applied to the system. Repair grid elements with the 2120 Defroster Grid Repair Kit.
Buss Bar
The buss bars run vertically on each side of the grid lines at each edge of the window and carry the power to each grid line. Rebuild defroster damage on the side buss bars with the 2000 Tab Bonding Kit.
Tabs
Two metal tabs are normally bonded or soldered to the main buss bars. These tabs make the electrical connection between the defroster and the vehicle’s electrical defroster circuit. Bond tabs back to the rear window defroster with the 2000 Tab Bonding Kit. Replace damaged defroster tabs with the Uni-Clip Tabs.
Why Defrosters Fail
Typically there are several ways rear window defrosters fail.
 Defroster GRIDS
 Defroster GRIDS
The thin brown horizontal lines can be broken or scratched away from the rear glass, causing the defroster to only partially defrost the rear window. This damage is repaired with the Frost Fighter Grid Kit. The smallest break or crack in the grid can cause the defroster to fail so careful visual inspection is needed. You can use a volt meter or a 12 Volt Test Lamp as well.
Defroster TABS
The tabs located along the sides of the defroster connect the defroster electrically to the vehicles defrost circuit. One tab is the positive and the other ground. If a tab comes off the defroster this will mean total instantaneous failure of the defroster.
In this case check the power tabs on the side of the defroster. Use the 2000 Frost Fighter Tab Kit to conductively re-bond the power tab.
Defroster AGE
Some older defrosters lose their conductivity and become to highly resistive which inhibits their ability to conduct electrical current. Defrosters use a silver filled coating that is heat cured in the inside of the rear window glass when the window is manufactured. This coating is made up of very tiny flakes of silver which when drawn together tightly by the coating form a perfect balance in electrical properties.
Over the years with sun, cleaning or scratching some of these conductive silver particles can come off the glass creating more and more electrical resistance until the defroster stops working all together. If the grid is scratched you can use the Defroster Repair Grid Kit to fix the areas that have the small breaks.
If the grid is generally shot then you might think about a Clear View defroster replacement kit that can replace the entire grid. See the Clear View Defroster Guide.
Defrosters and WINDOW TINT
When window tint is applied to the glass it comes in direct contact with the defroster and ultimately bonds to the heating element material. Removing the tint can separate small conductive particles from the heating elements causing an increase in resistance and defroster failure. Defroster lines can also be cut during installation. There are other problems that can crop up and these are covered later in this guide.
Defroster Grid Breaks
 If the defroster clears only part of the rear window, this is usually a sign of a broken horizontal grid line. The first step in repairing this type of damage is to locate the break by visual inspection. The smallest break or crack can cause the defroster to fail. Be sure to have the work area well lighted.
If the break is not obvious after close visual inspection, use a volt meter or 12 volt lamp to help locate the damage. Turn on the defroster and touch one meter lead to each of the wide vertical bars along the sides of the defroster. The reading should be between 12 and 14 volts. If the volt meter shows a negative reading, reverse the leads. A good tip is to use aluminum on the leads to protect the grids from further damage.
 Now take readings at various places along the horizontal lines of the grid to isolate the break. When you pass over the break, the reading will change sharply. If you do not have a volt meter you can use the Frost Fighter Test Lamp. A really good way to identify broken or “worn out” lines is to switch on the defroster in cold/damp or humid weather to identify which lines are working and which are broken or damaged.
Once a break or breaks in the defroster grid has been located, it’s time to consider how to repair the problem. The Frost Fighter Grid Repair Kit is designed to repair grid damage.
Use the grid kit to precisely mask off the damaged area of the defroster. There may be more than one break in the grid so locate all the damage before proceeding.
 After the damaged areas have been located and masked, apply the repair material using the small cap brush supplied. Frost Fighter grid repair kits use a highly conductive silver polymer repair compound. This polymer bonds aggressively to glass and provides maximum electrical conductivity.
The material dries to the touch in 10 minutes and is usable in thirty minutes. The conductor is color matched to the reddish brown colors used in automotive defrosters for nearly invisible repairs. Repairs of up of 3-5 inches are common with the Frost Fighter kit.
Removing the masking tape before the polymer dries leaves a uniform highly conductive defroster repair. It is important that repairs be done at normal room temperatures (or hotter) and that the conductor be allowed to fully cure before activating the defroster.
Repairs can be completed even more quickly by applying heat to the repair. A lamp or hair dryer can be used to speed curing. Care must be used not to damage the glass or any tinting that may be on the window.
Defroster Tab Repairs
When the rear defroster does not work at all, small breaks in the horizontal grid can be eliminated as the problem. In this case, all of the horizontal defroster grid lines would need to be broken and it is very unlikely that this would happen without it being immediately obvious.
Begin trouble shooting a total grid failure by carefully inspecting the thick vertical side bars of the defroster. A break or scratch in one of these bars could cause the defroster to fail completely.
Use the Frost Fighter Defroster Grid Kit to repair any small breaks or scratches in these critical side bars.
 The more likely cause of a total defroster grid failure is a separated main power clip/tab. These critical tabs connect the defroster grid with the vehicle’s high amperage defroster circuit and are located on each of the defroster grid’s vertical side bars. These all important tabs can be knocked off of the defroster causing total defroster failure. Look for dangling wires near the sides of the defroster as a sure indication of this problem.
Reattaching Rear Defroster Tabs
Once the separated tab has been identified the challenge becomes reliably reattaching it to the defroster without damaging the back glass or defroster.
To reattach these separated tabs, pull the metal clip out of its connector and use the Frost Fighter Defroster Tab Repair Kit to repair the problem. The kit uses a fast curing, two part conductive silver adhesive to reattach the main power tabs to the vertical defroster bars. Frost Fighter silver adhesive comes in two syringes for precise dispensing and is mixed at a simple 1:1 ratio. It is important to mix the silver adhesive for at least 30 seconds.
 After mixing, dip the base of the tab into the adhesive to coat the area to be re-bonded to the defroster. Replace the separated tab over the area were it was originally separated from the defroster and rock gently to seat the tab base. Make sure the sliver adhesive overlaps onto the surface of the defroster to ensure the best electrical connection.
The simple Frost Fighter tab repair system is safe for all defroster tabs and will not cause additional damage to the defroster as soldering or other methods of tab repair can do. Frost Fighter tab bonding adhesive cures quickly and bonds aggressively forming both the electrical and structural connection in one simple operation. Repairs are stable in 10 minutes but need 24 hours at 75° F.
Tab repairs can be made in 30 minutes when heated. Use a hair dryer, heat gun or electric heater, heat lamp or other heat source to keep the bonding area warm during the repair and cure period. Heat to between 100 and 130 F (warm to hand) for at least thirty minutes for the best results.
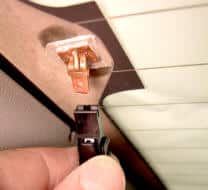
Tab causes lots of damage to defroster, missing sections – Easy fix
Frequently a large portion of the defroster is damaged when it as it comes off the window. This also happens when there have been many repair attempts. This damage is easily fixed by making a small pad of the Frost Fighter 2000 Tab Bonding kit adhesive.
 Since the tab is damaged make sure you have a Uni-Clip Defroster Tab and the Tab Bonding Kit handy. If the connector on the wire is damaged use our Uni-Con Connectors.
If the tab is broken and the base is still on the window there are several excellent repair options. See our Technical Bulletin 110 – Removing Defrosters Tabs from Window
Once the tab is off and the bonding site is clean, mask off an area around the damage using masking tape, apply the Frost Fighter tab bonding adhesive to the defroster inside the masked off area.
Squeegee flat the material with a mixing pad and place the new tab back in place on the adhesive pad. Wait five minutes for the bond to start the cure then use the hair dryer, lamp or other means to cure the bonding site (100-120F 30 minutes) and your back on the road.
 New Tab/Clips and Connectors
 New Tab/Clips and Connectors
When a metal tab comes off a defroster they can be lost or damaged. Uni-Clip factory replacements work with all vehicle defrosters and connectors including Ford, Honda, Toyota, Nissan, Subaru, GM, Chrysler and many others. Choose the tab that most closely resembles your vehicles existing tab.
Replace lost of damaged defroster connectors
These factory quality connectors attach to the vehicles defroster wire and mate with the defrosters tabs. Uni-Clip factory replacement connectors fit all makes and models.
New and Replacement Defrosters
If your vehicle did not come with a defroster or the existing defroster is damaged beyond repair then Clear View defrosters kits may be your solution.
Clear View Defroster Kits
Clear View Electric Rear Window Defroster Kits are complete rear window heaters that are easy to install.
These kits match the look and performance of factory installed defrosters, melting snow, ice and clearing mist in minutes for safe winter driving. Available in hundreds of sizes, each Frost Fighter Clear View kit includes strong self-adhesive heating elements on pre-spaced rolls for easy and accurate installation. These grid lines bond directly to the rear window and are color matched for that factory look with an unobstructed view.
 Defroster Controls and Timing Relays
 Defroster Controls and Timing Relays
Each Clear View defroster comes complete with all the components needed to install a factory quality rear window defroster including fully illustrated instructions.
Clear View kits include the little extras like an automatic timing switch which turns the defroster off after 10 minutes of operation for factory performance and appearance. Clear View kits are the ultimate in after market defroster performance and durability but do require some understanding of 12 volt systems to install.
Other Defroster Problems
If the problem isn’t a break in the defroster grid or a separated main power tab, begin by trying to turn the defroster system on.
If you hear the system’s relay click and the monitoring lamp is on, you know you have current at least to the switch. Now test the voltage at the defroster power clips/tabs (on the defroster) using a volt meter or test lamp with one lead to each of the tabs. If you see 12-14 volts or the test light is on then you have a good circuit and the problem is likely with the grid itself. Think separated tabs, scratches or old age.
Defroster Tabs?
If you get a zero voltage reading on the defroster’s buss bars (and the defroster is on) then test directly on the metal tabs/clips. If there is zero on the surface of the defroster next to the tabs but 12.5+ volts when tested directly on the metal tab then there is a break in the tab/defroster junction as the base of the tab. This can be caused by using non-conductive adhesive to bond the tabs to the defroster. See our Defroster Technical Bulletin for how to remove tabs.
Defroster Switch or Fuse?
If nothing happens when you try and turn on the defroster, check the fuse. Defroster grids draw lots of current and the fuse could easily be blown. If the fuse checks out the problem may be the defroster “on” switch. Using your vehicles wiring diagram determine which wire runs power to the switch and which runs out to the defroster. If the switch only has two wires then this is easy. If you jump the switch “in and out” wires and the defroster starts working the problem is the switch. If there is no power to the switch and the fuse checks out then the wire between the fuse and the switch is suspect.
Defroster Relay?
So you checked the fuse, defroster switch, main power tabs and the wiring but the defroster still does not work. It is time to take a look at the relay. Sometimes the defroster relay is easy to find and sometimes its under the dash. Some installations combine the timer and relay in one unit. As already mentioned you can normally hear the relay snap when the “on” switch is working. To check the relay be sure the coil side of the rely has continuity and there is power going to it. If this is the case, the relay and power supply are good. If you jumper the relay defroster wires (normally the heavier gauge) and the defroster works then the problem is the relay.
 Defroster Wiring?
 Defroster Wiring?
If all this checks then the wiring going back to the defroster is suspect. Test the wiring, paying careful attention to the ground side. You can check this by placing the volt meter probes on each side of the wide vertical bars of the defroster grid and moving the negative lead to somewhere on the vehicle’s body. If the reading starts at zero and then returns to normal when the lead is moved, the problem is a connection on the ground side of the grid circuit.
By using these tips and through careful troubleshooting, damaged rear window defrosters can be easily and economically repaired, saving hundreds of dollars in the process.
By using these tips and through careful troubleshooting, damaged rear window defrosters can be easily and economically repaired, saving hundreds of dollars in the process.
The Last Resort?
If you still have questions we can still help!
Our customer service staff tacks the most commonly asked customer questions and posts the answers in our FAQ (Frequently Asked Questions) department. Go to Frequently Asked Questions…
Of course our very own Dr. Defroster is standing (ok, more likely sleeping on the couch in the garage or looking for a second cup of coffee) by to help.
Email your defroster questions to the Doc and he will be back to you with answers.
Email the Doc here